Java/코딩테스트 연습 & 실습
[Java] 자바 네트워크 채팅 프로그램 구현 ( 소켓, 유니 캐스팅 )
현기
2022. 9. 2. 22:29
유니 캐스팅이란 서버와 클라이언트가 일대일로 통신하는 개념이다.
자바 소켓을 이용해서 유니 캐스팅 채팅 프로그램을 구현해 보았다.
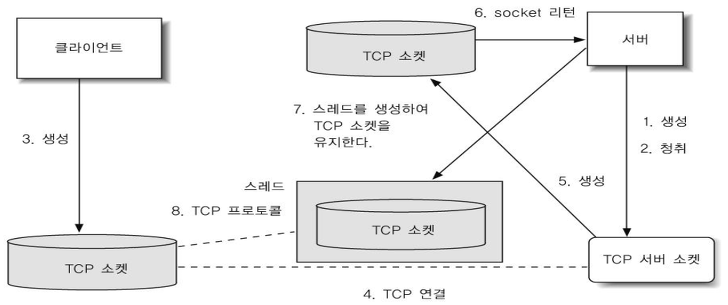
구조
소스코드
📝 UnicastServer
import java.io.*;
import java.net.*;

public class UnicastServer {
	private ServerSocket serverS;
	private UnicastServerThread ust;

	public UnicastServer(int port) { //포트번호
		try {
			serverS = new ServerSocket(port);
		} catch(IOException ioe) {
			ioe.printStackTrace();
			System.exit(0);
		}

		while(true) {
			try {
				System.out.println("클라이언트의 요청 기다리는 중");
				Socket tcpSocket = serverS.accept();
				System.out.println("클라이언트의 IP주소 : " + tcpSocket.getInetAddress().getHostAddress());

				//쓰레드 실행
				ust = new UnicastServerThread(tcpSocket);
				Thread thread = new Thread(ust);
				thread.start();

			} catch(IOException ioe) {
				ioe.printStackTrace();
			}
		}
	}

	public static void main(String[] args) {
		new UnicastServer(3000);
	}
}
가장 핵심이 되는 서버 코드다.
accept() 메서드를 통해서 클라이언트의 접속을 기다렸다가, 접속이 확인되면 소켓을 발급해준다.
스레드로 구현해야 소켓을 유지할 수 있다.
📝 UnicastServerThread
import java.io.*;
import java.net.*;

public class UnicastServerThread implements Runnable {
	private Socket tcpSocket;

	public UnicastServerThread(Socket tcpSocket) {
		this.tcpSocket = tcpSocket;
		System.out.println("-새로운 클라이언트 입장-");
	}

	@Override
	public void run() {
		MsgManager msg = new MsgManager(tcpSocket);

		try {
			while (true) {
				//메세지 받기
				msg.receiveMasage();

				//메세지 전송
				String masage = msg.inputMasage();
				if (masage == "exit") break;
				msg.sendMasage(masage);
			}

		} catch (IOException ioe) {
			ioe.printStackTrace();

		}
	}
}
서버 클래스다.
스레드가 생성되면 새로운 클라이언트가 입장했다는 메세지를 프린트한다.
MsgManager 클래스를 활용해서 클라이언트와 메세지를 주고받는다.
📝 UnicastClient
import java.io.*;
import java.net.*;

public class UnicastClient {
	private String ip;
	private int port;

	public UnicastClient(String id, int port) throws IOException{
		this.ip = ip;
		this.port = port;

		Socket tcpSocket = getSocket();
		MsgManager msg = new MsgManager(tcpSocket);

		try {
			while(true) {
				//메세지 전송
				String masage = msg.inputMasage();
				if (masage == "exit") break;
				msg.sendMasage(masage);

				//메세지 받기
				msg.receiveMasage();
			}

		} catch(IOException ioe) {
			ioe.printStackTrace();

		}
	}

	public Socket getSocket() {
		Socket tcpSocket = null;
		try {
			tcpSocket = new Socket(ip, port);
		} catch (IOException ioe) {
			ioe.printStackTrace();
			System.exit(0);
		}
		return tcpSocket;
	}

	public static void main(String[] args) throws IOException {
		new UnicastClient("localhost", 3000);
	}
}
사용자인 클라이언트 클래스다. getSocket 메서드를 통해 소켓을 가져오고
UnicastServerThread 클래스와 마찬가지로 MsgManager 클래스를 통해 메세지를 주고받는다.
📝 MsgManager
import java.io.*;
import java.net.Socket;

public class MsgManager {
	private Socket tcpSocket;

	public MsgManager(Socket tcpSocket) {
		this.tcpSocket = tcpSocket;
	}

	//메세지 전송
	public void sendMasage(String masage) throws IOException {
		try {
			PrintWriter writer = new PrintWriter(tcpSocket.getOutputStream());
			writer.println(masage);
			writer.flush();

		} catch(Exception e) {
			System.out.println(e.getMessage());

		}
	}

	//메세지
	public String inputMasage() throws IOException {
		System.out.print("메세지 입력 : ");
		BufferedReader br = new BufferedReader(new InputStreamReader(System.in));
		String masage = br.readLine();
		return masage;
	}

	//메세지 받기
	public void receiveMasage() throws IOException {
		try {
			BufferedReader br = new BufferedReader(new InputStreamReader(tcpSocket.getInputStream()));
			System.out.println("수신메시지 : " + br.readLine());
		} catch(Exception e) {
			System.out.println(e.getMessage());
		}
	}

}
꼭 필요한 클래스는 아니지만, 중복되는 코드의 길이를 줄이기 위해 메세지의
전송과 수신을 담당하는 클래스를 만들었다.
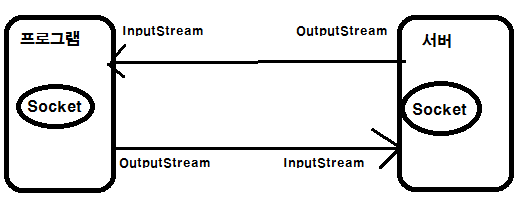
다음 사진과 클라이언트 소켓과 서버 소켓이 연결 되었다면,
양쪽의 소켓으로부터 입력 스트림과 출력 스트림을 얻을 수 있다.
PrintWriter writer = new PrintWriter(tcpSocket.getOutputStream());
BufferedReader br = new BufferedReader(new InputStreamReader(tcpSocket.getInputStream()));
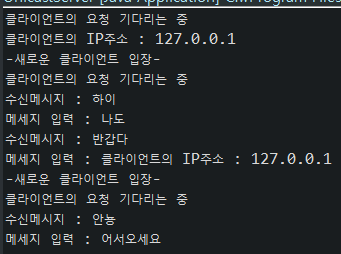
결과화면
참고 문헌 :